In this guide, I'll show you exactly how to build your own AI support agent in one weekend. No PhD required—just basic technical skills and willingness to learn.
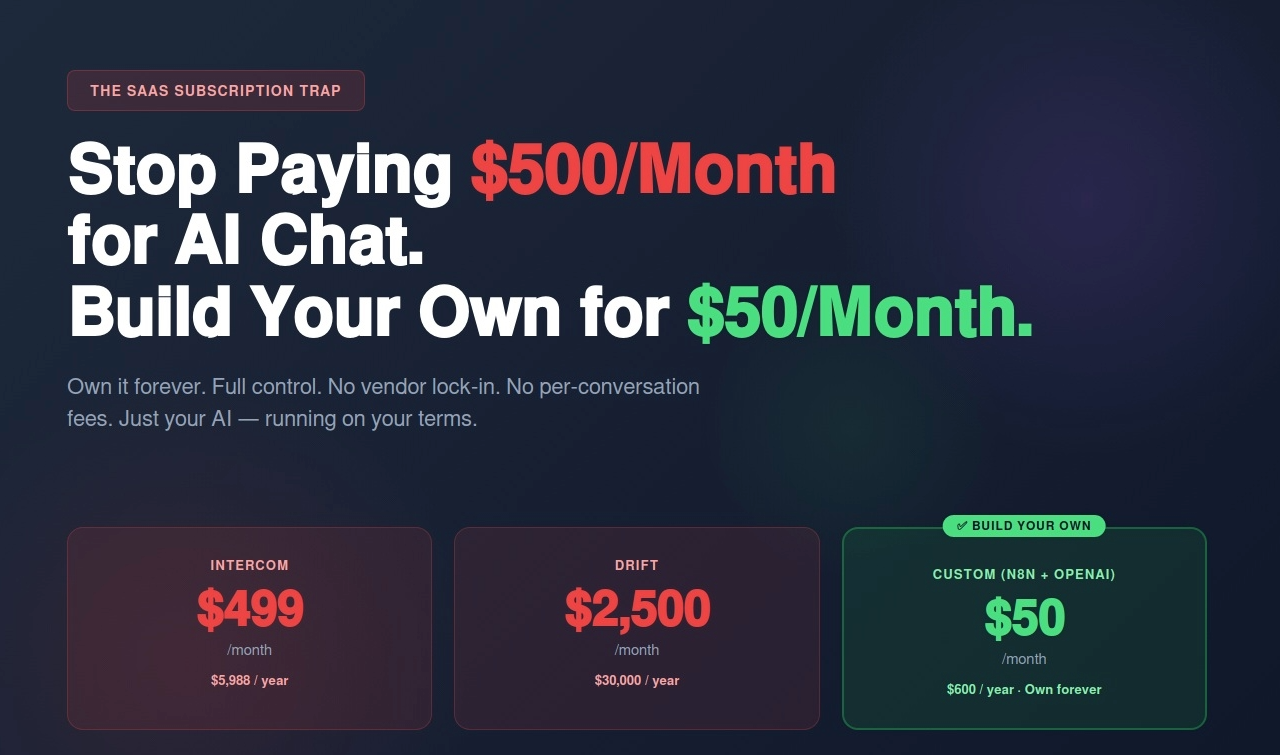
You're paying $499/month for Intercom.
$399/month for Drift.
$299/month for Tidio.
Total: $1,197/month = $14,364/year for AI chat support that:
What if you could build the exact same thing for $50/month and own it forever?
No subscriptions. No per-conversation fees. No vendor lock-in. Just your own AI support agent that you control completely.
I'm Renzo, founder of RDC Group. I help businesses escape the SaaS subscription trap by building automation they own. Over the past year, I've helped companies build custom AI chat agents using n8n + OpenAI, and the results are clear:
In this guide, I'll show you exactly how to build your own AI support agent in one weekend. No PhD required—just basic technical skills and willingness to learn.
Let's be honest about what you're actually paying for with AI chatbot SaaS.
Typical mid-size ecommerce company:
Customer support tools:
Other "essential" SaaS:
And here's the worst part: You own nothing. Stop paying, everything stops working.
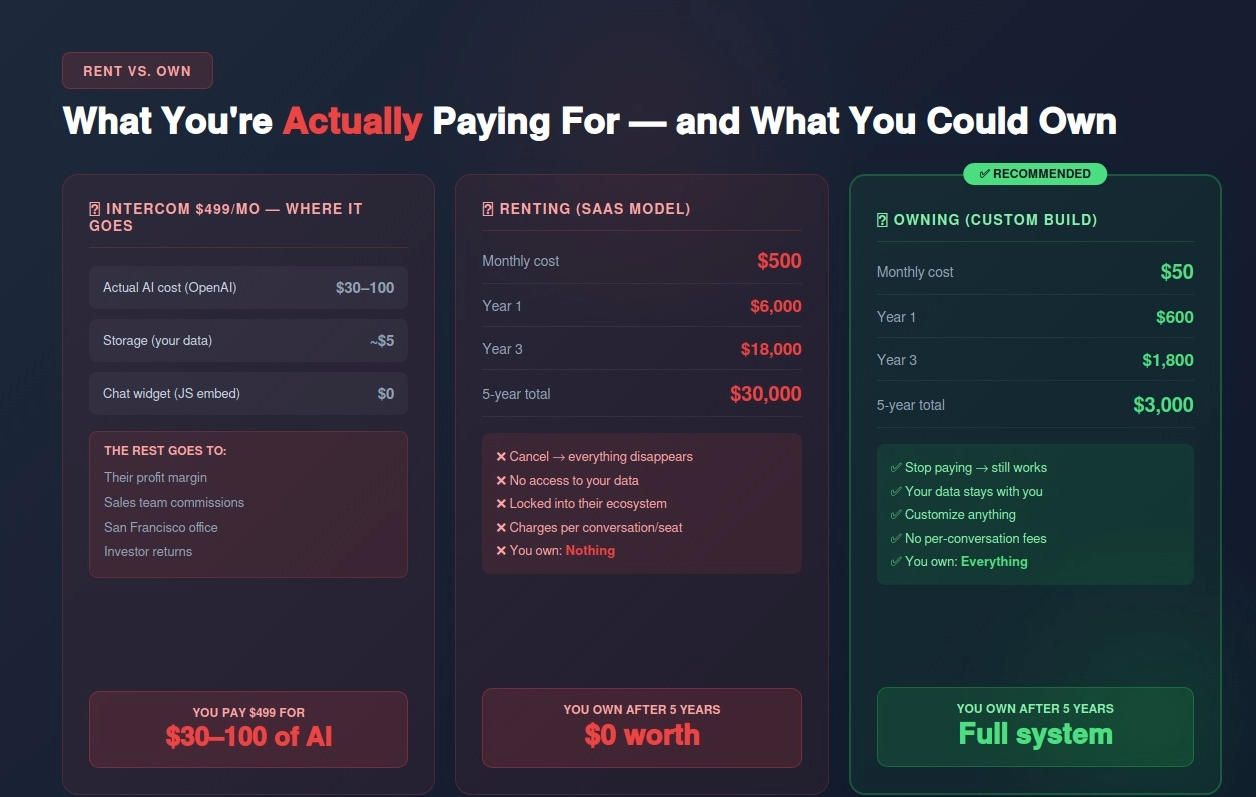
Let's break down Intercom's $499/month plan:
What they provide:
What you're paying:
The AI itself? OpenAI's API costs $0.03-0.10 per conversation. For 1,000 conversations/month, that's $30-100 in actual AI costs.
You're paying $499/month for $30-100 of AI, wrapped in their software.
Renting (SaaS):
Owning (Custom build):
Savings over 5 years: $27,000 (for one tool)
Multiply this across 5-10 SaaS tools and you're saving $100K-$250K over 5 years.
By the end of this guide, you'll have a fully functional AI customer support agent that:
Capabilities:
Technology stack:
Total monthly cost: $50
Total setup time: 6-12 hours (one weekend)
No code? Mostly no-code. Some basic JavaScript for the chat widget, but I'll provide the complete code.
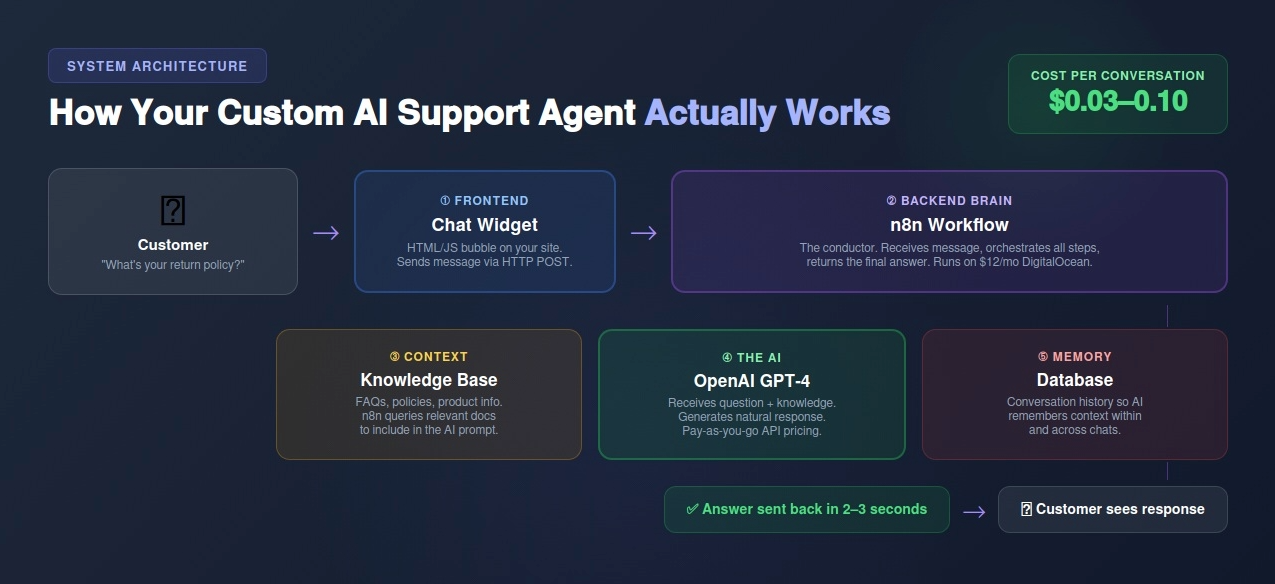
Before we dive into building, let's understand how this works.
1. Chat Widget (Frontend) Your customer sees a chat bubble on your website. They type a question. This is pure HTML/JavaScript that you embed on your site.
2. n8n Workflow (Backend Brain) When customer sends message, it goes to n8n. n8n is the conductor—it decides what to do with the message.
3. OpenAI API (The AI) n8n sends the customer's question to OpenAI GPT-4. GPT-4 processes the question against your knowledge base and returns an answer.
4. Knowledge Base (Context) Your help articles, FAQs, product info stored in a database or document. AI pulls from this to answer questions.
5. Database (Memory) Stores conversation history so AI knows context ("Earlier you asked about shipping...").
Customer's perspective:
Behind the scenes:
Total cost per conversation: $0.03-0.10 (OpenAI API only)
Option A: Self-host on DigitalOcean ($12/month)
# Install Node.js
curl -fsSL https://deb.nodesource.com/setup_18.x | sudo -E bash -
sudo apt-get install -y nodejs
# Install n8n globally
sudo npm install -g n8n
# Run n8n
n8n start
Option B: Use n8n Cloud ($20/month)
n8n Cost: $12-20/month
OpenAI Cost: Pay-as-you-go
Option A: Simple text file approach
Create a file called knowledge-base.txt:
# Shipping Policy
We offer free shipping on orders over $50 to the US. Standard shipping takes 3-5 business days. Expedited shipping (1-2 days) available for $15.
# Return Policy
30-day money-back guarantee on all items. Items must be unused and in original packaging. Refund processed within 5-7 business days of receiving return.
# Product Information
[Include your key product details, specs, FAQs]
# Contact Information
Email: support@yourcompany.com
Phone: (555) 123-4567
Hours: Monday-Friday 9 AM - 6 PM EST
Option B: Structured database (more advanced)
Use Airtable or Google Sheets:
This allows AI to search by category.
For this guide, we'll use Option A (simpler to start).
The workflow structure:
Step-by-step in n8n:
Node 1: Webhook
Node 2: Code - Load Knowledge Base
// Load your knowledge base (in production, load from file or database)
const knowledgeBase = `
# Shipping Policy
We offer free shipping on orders over $50 to the US. Standard shipping takes 3-5 business days.
# Return Policy
30-day money-back guarantee on all items.
`;
return {
json: {
message: $input.all()[0].json.body.message,
knowledge: knowledgeBase
}
};
Node 3: HTTP Request - OpenAI API
{
"model": "gpt-4o-mini",
"messages": [
{
"role": "system",
"content": "You are a helpful customer support agent. Answer questions based only on this knowledge base: {{ $json.knowledge }}"
},
{
"role": "user",
"content": "{{ $json.message }}"
}
]
}
Node 4: Code - Extract Response
const response = $input.all()[0].json;
const answer = response.choices[0].message.content;
return {
json: {
answer: answer
}
};
Node 5: Respond to Webhook
Save and activate workflow!
The complete chat widget code (save as chat-widget.html):
<!DOCTYPE html>
<html>
<head>
<style>
/* Chat bubble button */
#chat-bubble {
position: fixed;
bottom: 20px;
right: 20px;
width: 60px;
height: 60px;
background: #007bff;
border-radius: 50%;
cursor: pointer;
box-shadow: 0 4px 12px rgba(0,0,0,0.3);
display: flex;
align-items: center;
justify-content: center;
z-index: 1000;
}
#chat-bubble svg {
width: 30px;
height: 30px;
fill: white;
}
/* Chat window */
#chat-window {
position: fixed;
bottom: 90px;
right: 20px;
width: 350px;
height: 500px;
background: white;
border-radius: 12px;
box-shadow: 0 4px 20px rgba(0,0,0,0.2);
display: none;
flex-direction: column;
z-index: 1000;
}
#chat-window.open {
display: flex;
}
/* Chat header */
#chat-header {
padding: 15px;
background: #007bff;
color: white;
border-radius: 12px 12px 0 0;
font-weight: bold;
}
/* Messages area */
#chat-messages {
flex: 1;
overflow-y: auto;
padding: 15px;
}
.message {
margin-bottom: 10px;
padding: 10px;
border-radius: 8px;
max-width: 80%;
}
.message.user {
background: #007bff;
color: white;
margin-left: auto;
}
.message.bot {
background: #f1f1f1;
color: #333;
}
/* Input area */
#chat-input-area {
padding: 15px;
border-top: 1px solid #ddd;
display: flex;
gap: 10px;
}
#chat-input {
flex: 1;
padding: 10px;
border: 1px solid #ddd;
border-radius: 6px;
}
#chat-send {
padding: 10px 20px;
background: #007bff;
color: white;
border: none;
border-radius: 6px;
cursor: pointer;
}
</style>
</head>
<body>
<!-- Chat bubble -->
<div id="chat-bubble" onclick="toggleChat()">
<svg viewBox="0 0 24 24"><path d="M12 2C6.48 2 2 6.48 2 12c0 1.54.36 3 .97 4.29L2 22l5.71-.97C9 21.64 10.46 22 12 22c5.52 0 10-4.48 10-10S17.52 2 12 2zm0 18c-1.38 0-2.69-.32-3.86-.88l-.28-.14-2.86.49.49-2.86-.14-.28C4.32 14.69 4 13.38 4 12c0-4.41 3.59-8 8-8s8 3.59 8 8-3.59 8-8 8z"/></svg>
</div>
<!-- Chat window -->
<div id="chat-window">
<div id="chat-header">Chat with us!</div>
<div id="chat-messages"></div>
<div id="chat-input-area">
<input id="chat-input" type="text" placeholder="Type your message...">
<button id="chat-send" onclick="sendMessage()">Send</button>
</div>
</div>
<script>
const WEBHOOK_URL = 'https://your-n8n-server.com/webhook/chat'; // Replace with your n8n webhook URL
function toggleChat() {
document.getElementById('chat-window').classList.toggle('open');
}
function addMessage(text, sender) {
const messagesDiv = document.getElementById('chat-messages');
const messageDiv = document.createElement('div');
messageDiv.className = `message ${sender}`;
messageDiv.textContent = text;
messagesDiv.appendChild(messageDiv);
messagesDiv.scrollTop = messagesDiv.scrollHeight;
}
async function sendMessage() {
const input = document.getElementById('chat-input');
const message = input.value.trim();
if (!message) return;
// Show user message
addMessage(message, 'user');
input.value = '';
// Show typing indicator
addMessage('Typing...', 'bot');
try {
// Send to n8n
const response = await fetch(WEBHOOK_URL, {
method: 'POST',
headers: {'Content-Type': 'application/json'},
body: JSON.stringify({message: message})
});
const data = await response.json();
// Remove typing indicator
const messages = document.getElementById('chat-messages');
messages.removeChild(messages.lastChild);
// Show AI response
addMessage(data.answer, 'bot');
} catch (error) {
console.error('Error:', error);
addMessage('Sorry, something went wrong. Please try again.', 'bot');
}
}
// Allow Enter key to send
document.getElementById('chat-input').addEventListener('keypress', function(e) {
if (e.key === 'Enter') sendMessage();
});
</script>
</body>
</html>
To use this:
Test conversation:
If it doesn't work:
Once working, test edge cases:
Current limitation: AI doesn't remember previous messages in the conversation.
Solution: Store conversation history in database.
Simple approach using Airtable:
Advanced approach: Use PostgreSQL or MongoDB for more control.
When should AI escalate to human?
Implementation in n8n:
Add logic node after OpenAI response:
const answer = $json.answer;
// Check if AI doesn't know
if (answer.includes("I don't have") || answer.includes("I'm not sure")) {
return {
json: {
escalate: true,
answer: "Let me connect you with a team member who can help. What's your email?"
}
};
}
// Check if customer requests human
if ($json.message.toLowerCase().includes("speak to") || $json.message.toLowerCase().includes("human")) {
return {
json: {
escalate: true,
answer: "Of course! I'll transfer you to our team. One moment..."
}
};
}
return {json: {escalate: false, answer: answer}};
Then add node:
Add language detection:
// Detect language (simple approach)
const message = $json.message;
const isSpanish = /[áéíóúñ]/i.test(message);
// Add to OpenAI prompt
const systemPrompt = isSpanish
? "Responde en español..."
: "Respond in English...";
Detect frustrated customers:
// Ask OpenAI to rate sentiment
const sentiment = /* OpenAI response: positive/neutral/negative */;
if (sentiment === 'negative') {
// Priority escalation
sendSlackAlert("Frustrated customer detected");
}
Log conversations to HubSpot/Salesforce:
Track metrics:
Use Google Sheets or build custom dashboard.
One-time costs:
Monthly costs:
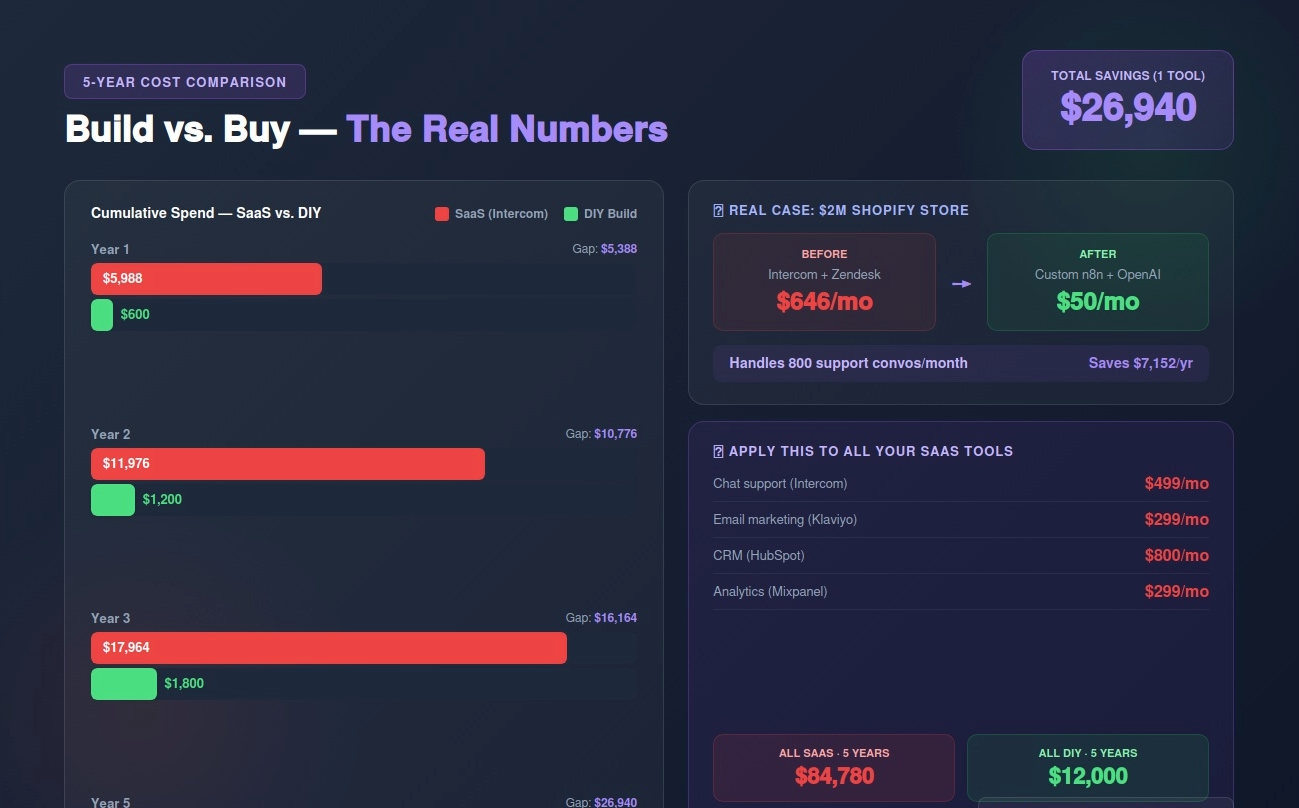
Year 1: $50 × 12 = $600
Year 2: $50 × 12 = $600
5 years: $3,000
Monthly cost: $499
Year 1: $5,988
Year 2: $5,988
5 years: $29,940
Savings over 5 years: $26,940
With SaaS: Stop paying → everything disappears
With DIY: Stop paying → you still own the code, the workflow, the system
Even if you stop hosting it, you have the n8n JSON export, the chat widget code, the knowledge base. You can turn it back on anytime for $12/month.
Problem: You create a 100-page knowledge base on Day 1.
Why it fails: AI gets confused with too much information. Slower responses. More hallucinations.
Solution: Start with top 10 FAQs only. Expand gradually based on what customers actually ask.
Problem: AI tries to answer everything, even when it shouldn't.
Why it fails: Frustrated customers when AI can't help with complex issues.
Solution: Implement clear escalation triggers (see Part 8).
Problem: You test "happy path" only (questions AI knows answers to).
Why it fails: Customers ask weird, unexpected questions.
Solution: Test with:
Problem: You build it and forget about it.
Why it fails: Don't know if it's working, what questions are common, where it's failing.
Solution: Log every conversation. Review weekly. Update knowledge base based on what customers ask.
Background: $2M/year Shopify store selling home goods.
Problem: Paying Intercom $499/month + Zendesk $147/month = $646/month for customer support.
Built custom AI:
Results:
Cost comparison:
ROI: Paid for itself in first month.
The problem: You're paying $500+ per month for AI chatbot SaaS that you'll never own.
The alternative: Build your own in one weekend for $50/month. Own it forever.
The math:
What you own:
Time investment: 6-12 hours (one weekend)
Technical skills needed: Basic HTML/JavaScript, willingness to learn
Ready to escape the SaaS trap?
I'll help you build your own AI support agent (and any other automation you want to own instead of rent).
Contact:
Email: renzo@rdcgroup.co
Website: rdcgroup.co
The SaaS model: Pay forever, own nothing
The ownership model: Pay once, own everything
Your choice: Rent AI chatbots for $30K over 5 years, or build your own for $3K and own it forever.
This is just one example. Apply this philosophy to:
Total SaaS trap: $1,413/month = $84,780 over 5 years
Total DIY: $200/month = $12,000 over 5 years
Total savings: $72,780 over 5 years
Own it. Don't rent it.

